每次写完博客,需要在本地编译,然后再手动通过WinSCP送到服务器上。作为一个懒人,这上面几步下来还是觉得麻烦,而且每次编译又会生成一顿不需要的文件,于是便决定整点自动化的流程,直接解放双手。
因为我的博客在没买服务器之前都是托管在Github上的,于是自然而然地就想到了Webhook,在每次Push后自动发送消息给服务器,让其自动拉取代码。
网上的教程大多都是在本地编译,然而我觉得既然要懒,就一懒到底吧,编译也直接通过Github Actions来完成就行了。
流程
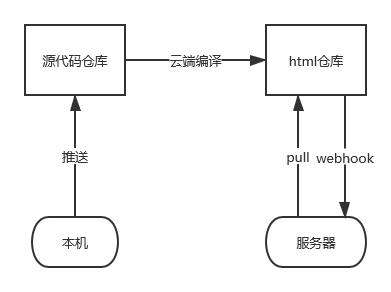
需要2个Github仓库(1个应该也可以),一个存放网站的源码,一个是存放编译好的html文件。整个工作流程就如下图所示:
步骤
设置脚本
首先要写一个shell脚本,功能很简单就是自动拉取代码。
1
2
3
| #!/bin/bash
cd /home/luobo/Blog
git pull
|
创建webhook服务后端
这里就直接使用NodeJS来创建,使用的原因很简单,因为已经有现成的插件可以使用了。
首先安装依赖
1
2
| npm i -S github-webhook-handler
npm i -g pm2
|
然后创建webhook.js作为后端
 1
 2
 3
 4
 5
 6
 7
 8
 9
10
11
12
13
14
15
16
17
18
19
20
21
22
23
24
25
26
27
28
29
30
31
32
33
| var http = require('http');
var spawn = require('child_process').spawn;
var createHandler = require('github-webhook-handler');
//注意要将 secret 修改你自己的
var handler = createHandler({ path: '/webhook', secret: 'xxxxx' });
http.createServer(function (req, res) {
handler(req, res, function (err) {
res.statusCode = 404;
res.end('no such location');
})
}).listen(6666);
handler.on('error', function (err) {
console.error('Error:', err.message)
});
handler.on('push', function (event) {
console.log('Received a push event for %s to %s',
event.payload.repository.name,
event.payload.ref);
runCommand('sh', ['./deploy.sh'], function( txt ){
console.log(txt);
});
});
function runCommand( cmd, args, callback ){
var child = spawn( cmd, args );
var resp = 'Deploy OK';
child.stdout.on('data', function( buffer ){ resp += buffer.toString(); });
child.stdout.on('end', function(){ callback( resp ) });
}
|
最后启动服务即可
Nginx设置反代
1
2
3
| location /webhook {
proxy_pass http://127.0.0.1:6666;
}
|
配置Github Webhook
在 html仓库的 Settings - webhooks 设置中创建一个新的 webhook。
将Content Type 设置为 application/json,secret 设置成与 webhook.js 中的相同。
trigeer选择Just the push event. 。
完成后Github会自动发起一个测试请求,如果返回为200说明配置完成,
配置自动编译
在源代码仓库的.github/workflows目录下创建deploy.yml,并填入以下内容。
 1
 2
 3
 4
 5
 6
 7
 8
 9
10
11
12
13
14
15
16
17
18
19
20
21
22
23
24
25
26
27
28
29
30
31
| name: Build and Deploy
on: [push]
# 任务
jobs:
build-and-deploy:
# 服务器环境:最新版 Ubuntu
runs-on: ubuntu-latest
steps:
# 拉取代码
- name: Checkout
uses: actions/checkout@v2
# 安装Hugo
- name: Setup Hugo
uses: peaceiris/actions-hugo@v2
with:
hugo-version: latest
extended: true
- name: Build
run: hugo
# 部署到 GitHub Pages
- name: Deploy to GitHub Pages
uses: JamesIves/github-pages-deploy-action@4.1.4
with:
BRANCH: main
FOLDER: public
token: ${{ secrets.GP_TOKEN }}
repository-name: luoboQAQ/luoboQAQ.github.io
|
注意要将最后的repository-name换为你自己的仓库,同时需要申请和配置Github Token,这里我就不展开了。
参考